

Part 2. Conditional submenus
This is the second article in a series that shows how you can dynamically change a WordPress menu, depending on runtime data.
- In Part 1. Introduction, I discussed a simple example that shows how you can add dynamic data to a menu item.
- In this Part 2 I show how to replace an entire submenu depending on whether the user is logged in.
- In Part 3, I will show how to automatically generate a submenu for a taxonomy.
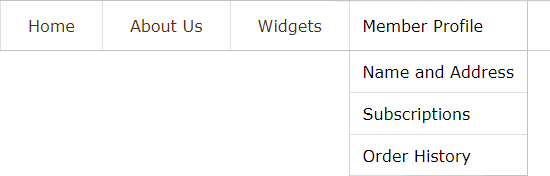
Example: Conditional Member Profile menu
In this example, one of the menu items allows the user to login to the website. This could be any login, not necessarily a WP login. If this is a membership site, this would be where members login. If it is an e-commerce site, customers could login to their account in this way.

Once the user is logged in, you don’t want to show the Login item anymore. Let’s say you want to replace it with a submenu that allows them to view their profile and other account data. Something like this:
Designating which menu items should be hidden
First, we need a way to say which menu items are only for logged-in users, and which are only for users that are not logged in. WordPress allows us to add new attributes to menu items, but I find it simpler to use the existing “CSS Classes” attribute.
Note: If you don’t see the CSS Classes box, you need to enable it in the Screen Options.
Instead of an actual class name, I assigned non-members-only to the Login menu item, and members-only to the Member Profile item. I have not defined these classes in any CSS file, their only purpose is to tag the menu items so that the code below will work.
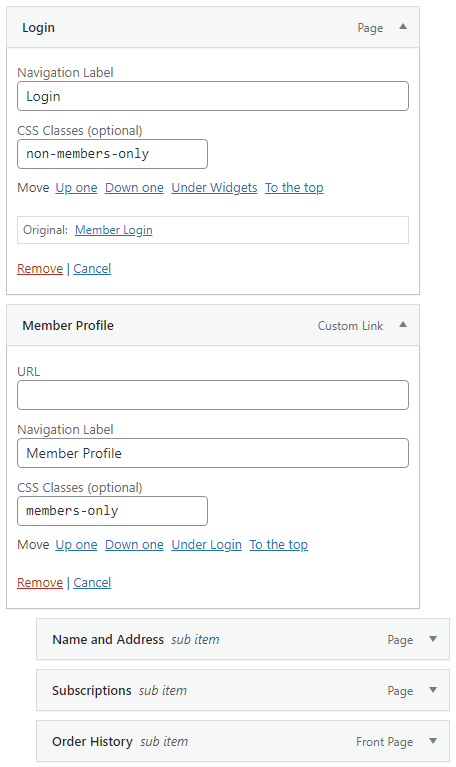
Note that there is no need to tag the submenu items under Member Profile. When the Member Profile item is hidden, the entire submenu under it is automatically hidden as well.
Hiding or revealing menu items
There is one CSS class that you do need to define in your (child) theme’s style.css file. This class is used by the code below to hide the menu item.
.hidden-menu-item {
   display:none;
}
The actual work of modifying the menu before it is being displayed is done in a filter, just like we did in Part 1.
The code examines all menu items, and when it finds one tagged with class members-only, it hides it if the user is not logged in. Similarly, items tagged with non-members-only are hidden if the user is logged in.
add_filter( 'wp_nav_menu_objects', 'nav_menu_filter', 10, 2 );

function nav_menu_filter( $menu_items, $args )  {
	$loggedin = check_if_logged_in();
	foreach ($menu_items as $menu_item) {
		// Hide certain menu items depending on logged-in state
		// Note: The menu item's optional CSS Classes are stored as a (serialized) array
		$classes = get_post_meta( $menu_item->ID, '_menu_item_classes', true );
		if ((in_array('members-only', $classes) && !$loggedin) || (in_array('non-members-only', $classes) && $loggedin)) {
			$menu_item->classes = array_merge( $classes, array('hidden-menu-item') );
		}
	}
	return $menu_items;
}

function check_if_logged_in() {
	// Replace this according to your specific needs
	return is_user_logged_in()
}
And that’s it! Please use the Comments below to give feedback or ask questions.
The next article in this series will show how to automatically generate a taxonomy submenu.